Mt. Tagapo: A Complete DIY Guide

Tagapo: A mountain in an island

Laguna de Baie seen from Mt. Tagapo

There are times that almost everything just gets in your nerves. That's the sign that you need a time off, away from the bustles of your fast-paced existence. It's time to go somewhere isolated, where you can stretch your cramped muscles and make your heart race. 

Now, the question is, where can we find such place? The answer: Mt. Tagapo


Mt. Tagapo, or to quote Jose Rizal, "Susong Dalaga", is located in the island of Talim in Laguna de Baie. Compared with other mountains in CALABARZON, it is less crowded with climbers. 

This mountain offers a very different experience as you have to ride a barge for an hour to reach the jump off. Enjoy the stunning view of Laguna de Baie and the city lights of nearby Metro Manila.


Background

Jumpoff point: Brgy. Janosa, Binangonan, Rizal
Trail Difficulty: 2/9
Height: 438+ MASL
Trail Class: 1 - 2
Guide: Required, P500 for dayhike, P800 for overnight
Beginner Friendly? Definitely!

Mt. Tagapo is located in Talim Island, the largest island in Laguna de Baie. It is within the municipality of Binangonan, Rizal, about 33 KM south of Metro Manila. 

The Team


The bloggers at the summit of Mt. Tagapo
Pearly and Iantot, the Princess and the Pauper
The date of the climb was February 18, 2017, Saturday. There are only two of us in the climb party.  

HOW TO GET THERE

Slow ride to Brgy. Janossa
Barge Ride to Brgy. Janossa
  1. Go to Starmall, Shaw Boulevard
  2. From Shaw Boulevard, ride a jeepney going to Binangonan, Travel time 1 - 1.5 hours, fare P35.00
  3. Alight at Binangonan Port
  4. From Binangonan Port, ride a barge going to Brgy. Janosa, Travel time 45 min - 1 hr, fare P30
  5. Register at the barangay hall and secure a guide
Note: The barge ride is not really long. However, the travel time is usually lenghtened due to numerous stopovers to different barangays in Talim Island. You can opt to alight in the very first barangay then ride a tricycle to Brgy. Janossa. However, we recommend you to choose the first option to have a fuller experience. 
Brgy. Janossa registration area
Barangay Hall, jump-off point to Mt. Tagapo
The Trail

trail going to Mt. Tagapo
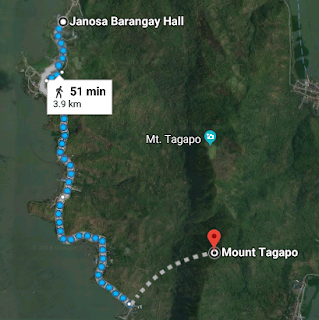
The initial part of the trail cuts through residential area. You will pass by the elementary school and the community clinic on the way to the trail head. As of the writing of this blogpost, hiring a guide is now required. (See Background). This segment is cemented and will be only a small portion of the climb. After 10 - 15 minutes, you will reach the end of the cemented path and the real climb begins. 

The trail is mostly gentle ascent through a wooded area. From Brgy. Janosa, it will take you about 1.5 - 2 hours to reach the summit of Mt. Tagapo. Majority of the trail leading to the main campsite is shaded so no worries of getting sunburned

The first sign that you are halfway through is the big mango tree. Here, you can take a breather and maybe a quickbite. In our case, we decided to continue on since it was already 8PM when we arrived at the mango tree and the sky decided to bless us with too much rain. 

The second part of the trail is a grassland. Reaching the grassland means that the main campsite is just 10 - 15 minutes away. The main campsite is a bit narrow as it can only accommodate 3 - 5 tents at a time. 

We immediately pitched our tent and prepared our dinner upon arrival. The thunderstorm was gaining momentum so we have to be fast. 


The blogger cooking at the mountain
The blogger practicing his culinary skills

DINNER RECIPE

Century Tuna
Luncheon Meat
Rice

The Summit

The summit of Mt. Tagapo is just 10 - 15 minutes way from the campsite. The trail going to the summit is a bit trickier than the first. The trail steepness now range from gentle to about 60 degrees. However, the rewards waiting for you at the summit overshadows the task. 

We were only given a short window to enjoy the summit. It was raining all night so when the morning came, the summit was shrouded with low clouds. Visibility in the main campsite was so poor that we almost decided to just skip the summit assault. However, the rain pettered out and the clouds dispersed. We left our things in the tent then alternately ran and walked to the summit, hoping to reach it before the clouds set in again.

The blogger on the way up


The main campsite is visible from this photo. (the orange dot on the background). 

10 minutes later, after many near-slips, we finally reached the summit. 

The bloggers at the summit

The Princess and the Pauper 

Note: You can create field expedient poncho using a garbage bag. Just make sure that you will dispose it properly after use. 

We spent about an hour (we really enjoyed the view) on the summit. From the vantage point, you can see the distant high-rise buildings of Manila, Mt. Sembrano and the expanse of Laguna de Baie.

Relationship goals
Mt. Tagapo

The Descent 

On the way down, all you have to do is to backtrack the trail. According to our guide and other locals, a new trail is in development so you can do a traverse. Watch out for it in the future. The descent took us only about 45 minutes to reach the registration area. There are facilities available at the registration area where you can wash up and eat before you go back to Manila. 

Too Many Goodbyes!


Mt. Tagapo, semi-covered with clouds

It was already late morning when we finally left the island. The feeling was bittersweet as the boat slowly pulled away from the quay. We looked back and saw the island fading in the distance. We bid our farewell, and look forward for new adventures. 

THINGS TO CONSIDER

  1. If planning a day hike, make  sure that you reach the port early as the barge has to be full before it sails. 
  2. Due to its relative isolation, it is quite difficult to leave the island immediately in case of emergency. You'll have to charter a barge if you have to do so which will cost you about P1,500.00.
  3. Practice the LNT Principles all the time. 
  4. And most importantly, keep a positive attitude. Your state of mind will decide the quality of your trip. Even the sunniest day will be dampened if you look at all things negatively. 

Hey, now that we are at the bottom, what are you still doing here? Grab your backpack now and just go! Don't forget to share, like and subscribe to our blog. 

Travel Goals to Accomplish Before You Die

Travel Goals to Accomplish Before You Die

Here are the compilation of the top Travel Goals you have to accomplish before you die! 

Top Five Things to do in Sagada


Sagada is a 5th class municipality in Mt. Province situated about 400 kilometers north of Manila. This idyllic municipality can only be reached by land travel. It has a cool climate all year round, with a stunning view of the Cordillera mountain range. Activities in Sagada include hiking, spelunking, foodtripping, swimming, and(click to read more)


Top Five Things to do in Baguio

Finally, it's summer! And when we talk about summer, we can never forget about Baguio City, the Summer Capital of the (click to read more)


Top Five Mountains to DIY for Beginners

Are you thinking of going more outdoorsy this year, but still can't decide on where to go? Well, you're in luck! This is our Top Five Mountains (click to read more)


Five Things to do in Baguio

Finally, it's summer! And when we talk about summer, we can never forget about Baguio City, the Summer Capital of the Philippines.

Here is our list of Things to do in Baguio:

1. Biking in Burnham Park

This is soooooooo basic. Biking in Burnham Park is almost a tradition to everyone who visits Baguio.  For just less than 100 Pesos, you can rent a mountain bike for an hour and leisurely pedal your way in the park. 

BIking in burnham park


2. Climb Mt. Cabuyao 

Enjoy a picturesque view of Baguio City from above by climbing Mt. Cabuyao. Just a 30-minute ride from Burnham Park to Green Valley, you can have the unconventional experience of Baguio unfamiliar to most visitors of the city. In addition, if you are a fan of the teleserye Forevermore (LizQuen), you can find the fictional barangay of La Preza near the summit of Mt. Cabuyao. 

Trail difficulty 2/9 
Hours to Summit - 2 hrs
MASL 2,025 

If fit enough, you can make this a twin hike with Mt. Sto TomasView from the summit of Mt. Cabuyao
Baguio City from Mt. Cabuyao. 

3. Adrenaline Rush in Tree Top Adventure

Tree Top Adventure is an adventure park located near Camp John Hay. It offers various rides that will definitely make your heart pound. What's so special in Tree Top Adventure? It is located within a pine tree forest, so you can be excited and appreciative of nature at the same time. Woohoo! 

Rides to Experience

Silver Surfer
Canopy Ride
Funicular (most extreme)
Tree Drop
Superman Ride


Adrenaline rush while riding the silver surfer
Silver Surfer

4. Trekking in Camp John Hay

Start one of your mornings with a trek in Camp John Hay. Enjoy the cool morning air while stomping amidst pine trees. Pump up those legs, people!

Trekking at Camp John Hay

5. Visit The Lost Cemetery of Negativism

If there is one thing you should bury, that is negativism. Cemetery of Negativism is a very creative park near Camp John Hay. Here you can see the tombstone of different mindsets that you should kill before it kills you. 

Cemetery of Lost Souls

This is particularly funny for me. LOL

Baguio has a lot to offer which will be impossible to put here in our blog. Here are other things you should also try:

1. Burnham Night Market
2. Food Trip Baguio - Ketchup Community, 50s Diner
3. Mines View Park
4. Bencab Museum
5. PMA
6. La Trinidad Strawberry Farm
7. Wright Park, Botanical Garden

And many many more. There are many things to do and places to go, so start your adventure now. 

Mt. Talamitam: A Complete DIY Guide for Beginners

Mt. Talamitam at the background
If you're lookin for a extraordinary date that is near Manila, then Mt. Talamitam is for you. Just a 2-hr drive from Manila, you can see in real life the Teletubby Land or Heidi Land (for batang 90s)  and enjoy a scenic 360 degree view of Nasugbu, Batangas and other nearby municipalities. 

Fast Facts


Height of Mt. Talamitam? 630+ MASL according to Pinoymountaineer.com. 
Trail description? First Part - forest Second Part - Plateau, Grazing land / Pasture Third Part -  Steep Ascent (some parts is almost 60 degree-angle assault)
Jump off ? Brgy. Bayabasan
Landmark? Bayabasan Elementary School
River Crossing? YES
Guide? Available at the jump-off
Beginner Friendly? Definitely

Getting There

Ride a bus going to Nasugbu, Batangas
Alight to the Brgy. Bayabasan. Registration is very easy to spot as it is just on the side of the road

The Climb

The blogger at the registration area
Mt. Talamitam is situated in the municipality of Nasugbu, Batangas. Its jump off is in Brgy. Bayabasan. You can easily find the jump off as it is near Bayabasan Elementary School. It will be on the right side of the road if you're coming from Tagaytay. 


From the registration, you will have to walk about a half kilometer or so of cemented road to reach the actual trail leading to the mountain.

Before reaching the initial trail, you will have to cross the Layong Bilog river.

There are two ways to cross the river. One, using the bamboo bridge, and the other is to go down the riverside and cross the shallow water.
The Bamboo bridge in Mt. Talamitam
Rickety bamboo bridge (testament of government efficiency)

The bamboo bridge is somewhat rickety so watch your step.  According to our guide, there used to be a metal bridge in that spot before but it was destroyed during a storm.

Crossing the river bridge will take you to the forested trail of the climb.

The forested trail offers both advantages and challenges.

First, you will be shaded at all times so no worries on having sunburn. However, being in the forest means humidity. It will be a hot and sweaty stretch until you reach the grassland. Second, you have to look out for protruding roots that may trip you. More of a nuisance than actual danger, you can use this to your advantage by grappling on these roots as there are some steep parts in this trail.

The forested trail may take an hour to complete. This will be followed by the grassland which is definitely more scenic and refreshing than the previous trail. At the end of the forested trail, there will be vendors who sell buko juice. Please do not leave your trash if you buy anything, especially plastic. The locals may allow you to leave your trash around the store but  it'll be difficult for them to carry all the trash with them on the way down.

Trail up to Mt. Talamitam
Grassland. Arrow shows the end of the forested trail. Batulao in the
background

The grassland is one of our favorite parts of the climb. It offers very scenic view of Mt. Batulao and Nasugbu, Batangas.


The view and wind will be enough to cool you off and erase your exhaustion. You can raise your hand  and pretend to be Maria of The Sound of Music (Doe! A deer! A Female Deer!).


The bloggers at the plains of Talamitam
Mt. Talamitam at the background
Grassland with Talamitam & Apayang at the background


Another advantage is that getting lost on the way up is almost nil. From the grassland, you can see all the trails leading to the summit.

As always, grassland trail has its advantages and challenges (opportunity cost!).

Sure its windy, but the sun will mercilessly bear down on you so be prepared with your sunscreen. It is advisable to hike this part early in the morning or late in the afternoon.


Some people are just terrified of cows. It may seem silly to be afraid of those future burgers or caldereta (JK!). But such fear has its merits. According to our guide, DO NOT approach the cows, especially the bulls (male cow) because they tend to charge if disturbed. Since the grassland trail cuts through pasture lands, expect that there will be cows (or bulls) around every bend. Moooooo! (Ghostly mooing).

It usually takes about thirty minutes to an hour to reach the final summit assault, depending on your pace. The last assault is quite steep with some parts of the trail having a 60-degree angle.

There are three trails, all leading to the summit with varying degrees of difficulty, length and characteristics.

Different trails going to summit

The orange trail is what the locals coined as the "Tuwid na Daan" trail because it offers the most straightforward path to the summit. In taking this trail, you can cut back about 20 minutes worth of hiking to the summit. However, it is steeper, some parts with almost 70-degree angle.

The red trail of course is the "Baluktot na Daan" as opposed with the orange one. It is relatively easier than the Tuwid na Daan, but it is more circuitous. Thus it will take you longer to reach the summit. There are also some large rocks along the trail which you can climb for an "instagrammable" shot.

The blue trail shares some of its part with the trail going to Mt. Apayang. Of the three trails, this is the easiest, but also with the less exciting view because it is covered by trees. the two other trails are open and grassy.

Personally, I  prefer climbing up using either red or orange trail, and take the blue trail on the way down to make it a mini-traverse.
The plains of batangas
View from the summit

Summit of Mt. Talamitam
Yey! Sa Wakas!

Majestic


The summit has breath taking views that photos cannot give proper justice.


Visible from the summit are the following peaks; Mt. Marami, Pico de Loro, Mt. Maculot and of course Mt. Batulao.

There is almost no shade at the summit. Fortunately, the locals constructed a small hut where climbers can sit and rest for a while before negotiating the descent.

You can spend an hour or until you have your fill of the view and photo. Just make sure to keep track of time because believe me, you don't want to spend 12 noon at the summit of Mt. Talamitam.


Descending on the trails of Mt. Talamitam
Going down is easier and requires less energy. But according to my experience, most of the trips, falls and untoward events usually occur on the way down. Maybe because of more strain on the knees, or just wrong mindset, I can't really tell.

On the way down, you can choose any of the three trails. You just have to backtrack to where you come from.

However, there is a fork in the grassland trail which confuses many climbers.

The trail leading to the right is more established because vehicles and horses use it for delivery but do not take it. YOU MUST TURN LEFT. or you will end up in Brgy. Aga. It is advisable to exit from where you enter because people from registration area will start looking for you after few hours, thinking something happened to you. Wag na Makulet okay?

Going down usually takes only 1.5 hours to 2 hours, all depending to your pace. If you still have the energy and time, try swimming in Layong Bilog which is also in the same barangay. Check out my other page about Layong Bilog.

There are facilities at the registration area where you can wash up and eat lunch. As a taghirap climber, we always have our packed lunch. Another advantage of Mt. Talamitam to other mountain is that its registration is just along the main highway. After eating and resting, just cross the road and wait for a bus. And that's it! You're on your way home na!

See you again next time! Check out our other pages for more moundates.

Tayak Hill: A DIY Guide to a Chill climb

Tayak Hill: A DIY Guide to a Chill Climb for Beginners

Mt. Cristobal behind the Cross
Mt. Cristobal peeking behind the clouds, as seen from the summit of Tayak Hill

Sometimes, the daily grind  just takes its toll on our body and mind that we need to unplug from time to time. However, what if you only have a day off and you don't want to batter yourself by doing the popular day hikes near the city? 

Then, Tayak Hills in Rizal, Laguna is the best for you. It has a very, as in, veeerrrry chill and safe trail. Aside from that, it has a particular serene aura and beautiful view of the surrounding towns of Laguna and the infamous Mt. Cristobal. 

Background

Jumpoff point: Brgy. Tala, Rizal, Laguna, in front of Rizal Elementary School
Trail Difficulty: 2/9
Height: 560+ MASL
Trail Class: 1
Beginner Friendly? Definitely!

Tayak Hill is situated between the towns of San Pablo and Rizal, Laguna - overlooking the Seven Lakes of San Pablo on one side and the mighty Mt. Cristobal on the other side. It is within Tayak Adventure Nature and Wildlife (TANAW). There is an entrance fee of P30 for Lagunense and P40 for non-Laguna residents.

Moreover, it is in the area of the protected landscape of Mt. Banahaw and Mt. Cristobal so abide the rules in order to avoid any inconvenience on your part.

Rules and regulations posted on the metal sheet
Be guided accordingly

The Team

The newset hiphop sensation
The newest hiphop sensation; Dj, Pearly, Venz and Ian
The date of the climb was January 27, 2018, Saturday. It was drizzling the entire day which added more thrill to our impromptu trip. 

How to get There

  1. From Manila, ride a bus going to Lucena City. Ask the conductor if the bus will pass by San Pablo City. Travel time, 2-3 hours
  2. Alight at San Pablo Medical, then ride a trike or a jeep going to Bayan
  3. From Bayan, you have to walk a bit to find the jeepeneys going to Nagcarlan. Jeepneys going to Nagcarlan are parked in front of a Fire Station at Barleta Street so you will not really miss it. 
  4. Ride a jeepney with Nagcarlan signboard. Ask the driver to drop you off at Rizal Elementary School. This will take you about 30 mins and 17 pesos per head. 
Red Fire trucks on fire station
Fire Station
Barleta Street
Barleta Street


The Trail

The trail starts in front of Rizal Elementary School. It is about a 6-km stretch, has a wide, cemented road, that cars, and even small trucks can pass through it. You can ride a tricycle going all the way up to the TANAW or you can choose to walk for a fuller experience. Take note that if you ride a trike, it will only take you at least 30 minutes to reach the summit. Meh. No more adventure. The tricycle ride will cost you about P40 per head. 

Google Map to Tayak Hill
Google Map: Trail going to Tayak Hill

cemented road going to Tayak Hill
Cemented Road to Tayak


If you choose to walk instead, this will take you about 1.5 - 2 hours to complete. The trail is covered by trees, so you will not be sunburned. For everyone's safety, walk in single file and do not occupy the entire road if you are a group. There are quite a lot of blind spots here, that vehicles can be a hazard if you do not take precautions. 


The team posing as Michael jackson
The Michael Jacksons
There are almost no threats in getting lost in this trail. Three-fourths (3/4) along the way, you will find a forked road. Both are well-established with one going up with a sign saying "To Landingan." DO NOT GO THERE. It might look like the right way since it's going up but it's not. Go straight up ahead instead, to the road going down. Continue walking on for 10-15 minutes. Then, you will finally see the entrance to the Tayak Adventure Nature and Wildlife.

The forked road of Tayak Hills
Do not follow the road sign

Inside TANAW

Tayak Adventure Nature and Wildlife (TANAW) is within the Mt. Banahaw- Mt. Cristobal Protected Landscape so rules shown above are strictly enforced. 

Tayak Adventure Nature and Wildlife

After paying the registration fee, you can immediately proceed to the summit which is only 30 - 45 minutes way. The trail going up is a stone stairs under a canopy of trees. You can feel the wind getting stronger as you go higher and higher.

The team posing as hiphop group
The Hiphop Girls
As of the day of the writing of this blog (February 3, 2018), everyone is required to take a detour away from the stairs as a construction project is going on. According to the staff, the municipal government is planning to create a Noah's Ark-like viewing deck atop the Tayak Hill.

You will go right, midway to the summit into a dirt part. Here, you will walk on the side of the hill which incidentally makes the trip more thrilling. Strong wind and beautiful scenery make up for the lack of stairs which we did not mind.

rugged path towards the summit
The detour towards the summit

The Prairie and the Summit

Everyone were in even higher spirit when we finally reached the clearing. It looks like a prairie in the 90's TV show Heidi. We broke into a run - excited to reach the prairie. We spent about 30 mins, just letting our inner child play in the grass and take pictures.

Kungfu Pose
Everybody loves Kung-Fu fighting, hooo!
the grassland of Tayak Hill
I can show you the world (lalalalal)

After a while, we proceeded to the summit where the iconic stone cross is located. You have to take note that this is also a pilgrimage site so keep your noise at the minimum. Again, a five-minute-long stairway connects the prairie to the summit.

Mt. Cristobal behind the Cross of tayak Hill
Mt. Cristobal at the background

Tayak Hill

We spent few quiet minutes atop the summit - just enjoying the scenery and have a few snaps taken. We had the entire summit to ourselves. Soon, the clouds started to descend obscuring much of the view, and lowering the temperature even more. After we had our fill of experience, we started the descent on the same path.

We took shelter on one of the three nipa huts on the prairie as the rain started to grow stronger. Tip: If you do not have a poncho or umbrella, you can use a garbage bag as an improvised poncho.

We backtracked our way down. There are some eateries near the registration area where you can have your lunch and even buy toiletries and wash up. But since it was cold, we decided to cap our activity on Tayak Hill. Yeah!!!

Looking for your next adventure?

Are you ready for your next great adventure? Booking.com is the best website to reserve lodgings and accommodations for your next trip. And guess what? Booking.com also offers free cancellation giving you the flexibility like no other website is offering. Your next great adventure lies in your fingertips, so BOOK NOW!
Booking.com


the team wearing garbage bag
The BASURABAG TEAM, TEAM NO LIGO

Sidetrips

Our Laguna Trip was not yet over since there are many other things to do near Tayak Hill.

Nagcarlan Underground Cemetery and the Nagcarlan Museum

The only one of its kind in the Philippines - the Nagcarlan Underground Cemetery houses the remains of the notable people of Nagcarlan, Laguna.


Nagcarlan Underground Cemetery
Grounds of Nagcarlan Underground Cemetery

Inside the Nagcarlan Museum
Nagcarlan Musuem
The Underground Cemetery and the Museum are free of charge. But I highly recommend to drop cash donations to their donation box for the upkeep of the place.

How to get here: In front of Rizal Elementary School, ride a jeepney going to Nagcarlan. Fare is P10 each, travel time: 10-15 minutes

Barleta Street Food Trip

The team eating barbeque
Food Trip in Laguna

End your day with an energizing foodtrip at Barleta Street. Isaw, betamax, BBQ, helmet (chicken head), adidas (chicken feet), bulaklak, and many more.

TIPS and Things to Consider


  1. Always, as in always practice, "Leave No Trace Principle." Taking care of the places we visit is part of our responsibilities. The Tayak Hill is a serene place but even it cannot escape the scourge of vandals. So please. 
  2. Follow rules and regulations of the Protected Landscape and the museums. The best way to ruin your day is to be caught doing prohibited acts. You may be thrown out of the premise or worse, into jail.
  3. Take note that you are not allowed to take photos inside the underground cemetery. You will not be accompanied so it is all up to you to follow it. Be a good citizen.
  4. Bring big plastic bags, like garbage bags for your trash and improvised poncho if needed. 
  5. Exercise! It may look easy but if you are not in shape, the chill trail of Tayak Hill will still be unforgiving.
  6. Bring positive attitude. Positive attitude will keep you warm despite the setbacks and difficulties you are facing. We were under the constant rain almost the entire trip, but it was not enough to dampen our mood. 

So, now that we are here at the bottom, what are you waiting for? Grab your bags now and let's go!

Featured Post

A Quiet Place: Sta. Lucia Falls

A Quiet Place: Sta. Lucia Falls A Quiet Place A Quiet Place? Why would I want that? Isn't that scary? No, of course. (Thanks...